In past columns we discussed installing for management and described things to look for when troubleshooting a system. However, as we like to say, maybe we should take half a step back and highlight that as an installer you are often asked to evaluate systems because they are having trouble — and then are asked to provide the fixes.
In addition, more installers are getting involved in real estate transfer inspections. So maybe now is the time to discuss standards for a thorough and complete system inspection.
As many of you know, we teach inspection classes for the National Association of Wastewater Transporters (NAWT). They have an inspection form and a very nice inspection manual that goes through all the procedures. You can get the form from the Web site at www.nawt.org.
In any case, the key is to follow some type of form or procedure consistently so that all the bases are covered. When we talk about a form here, we are referring to the NAWT form. If your state or local permitting authority has a form you are required to follow, that is great — just make sure it covers all of the information you need to gather.
An inspection likely focuses on the current use of the system, whether any changes will occur when the property changes ownership, or whether the current owner plans to make any changes to the house by the current owner. Here are the basic procedures to follow in a typical inspection.
Step 1: Current and future use
Gather all available data and details about the system. This includes local permits, information on soils in the area, a review of any other information at the planning and zoning office and a homeowner interview.
The first page of many forms includes information to be supplied by the homeowner: This will provide insight into water use habits within the house and will give you clues about what to look for when you open parts of the system.
For instance, if there is an in-home business such as a day care center, that could indicate increased flow and solids coming into the system. Ask about the age of the system and whether there have been any repairs or upgrades since installation. This will provide clues to the type and condition of the system.
Determine if there has been a previous inspection. Ask if the system has been regularly maintained, as that indicates how well the system has been cared for.
Step 2: Pretreatment devices
Obtain the site map and locations of system components from the zoning or health department if they are available. Discuss with the owner and clearly establish the property lines. Also, since you will be digging, make sure all the utilities are located by contacting your state one-call service.
If you need to do locating because there are no records or the owner does not know where the system is located, highlight that the inspection does not begin until the parts are located and that there is a separate fee for locating. Remember; you should establish and keep good records as you do the locating, because more than likely you will be back at the site in the future. So the documentation and the records are more important for you than for anyone else.
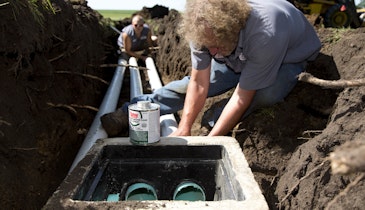
Step 3: Soil treatment system
All components of the system should be opened and evaluated for their operation. Make sure all the flow from the residence is collected in the tank. This may require the use of dye to indicate that the connection is secure.
The septic tank should be opened and pumped. Before pumping, evaluate the accumulation of sludge and scum and note any signs of previous backups within the tank. Such signs include toilet paper over the baffle or a line above the outlet elevation in the tank.
Add water downstream from the tank to make sure that effluent flows the way it should and does not back up into the tank or come out at the ground surface. After pumping, evaluate the tank for structural soundness, the presence and condition of the baffles, and any evidence that the tank is not watertight, such as root penetration.
Open and inspect the distribution or drop boxes. Again, note any evidence of solids carryover from the tank, as this could also indicate plugging problems in the soil treatment areas. Again, the boxes should be watertight — the presence of roots or of sediment that has run in with surface water would indicate problems.
Confirm the structural integrity of the distribution or drop boxes. Opening the boxes can help you establish the water level in the trenches or bed, and that will indicate how much of the system the current residents are using.
Walk the soil treatment area and probe it to determine water levels in the trenches or bed. Look for any signs of current or previous failure. Indicators of failure would be effluent coming to the surface, areas of lush green vegetation, areas of dead or decaying vegetation, odors or other evidence of sewage.
Step 4: Other system components
Inspect any other system components such as media filters (sand, peat or textile fabric), aerobic treatment units, constructed wetlands or others. Each of these has special operating conditions that need to be checked to determine if they are operating properly.
This step may require some contact with the manufacturer’s representative to determine how the system is supposed to operate. Once you have determined this, you can provide that information to homeowners as an additional service to aid their understanding of the system.
Step 5: Paperwork
Complete all necessary paperwork. Make sure the form you followed is filled out completely. If you have comments on the components, be sure they are clear and concise and that the homeowner understands them.
Clearly establish your recommendations for changes, repairs or upgrades. There should be enough detail so that if a question arises in the future, it can be verified for accuracy and used to guide decisions about repair or replacement.
We hope this short summary gives you an idea about what a complete inspection should involve. Good luck with your next inspection!