Interested in Excavating?
Get Excavating articles, news and videos right in your inbox! Sign up now.
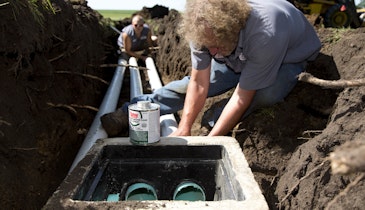
Excavating + Get AlertsLast month we discussed piping basics for the house sewer line and supply pipes in an onsite system. Now we’ll review best practices for excavating trenches, laying pipes for the dispersal portion of the system and bedding the pipe properly.
Trenches must be dug, prepared and backfilled in a way that prevents pipe damage. Common damage includes cracking, breaking joints and creating dips or bends in the pipe. Trench bottoms should be free of rocks and debris, continuous and provide uniform support. If there is bedrock, hardpan or large rocks on the trench bottom, the trench should be bedded with sand.
Trenches should be wide enough to work in and allow the use of compaction equipment. Generally, pipe manufacturers require a trench to be at least twice as wide as the diameter of the pipe. This allows enough space to snake small-diameter pipe from side to side on long runs and compensate for contraction and expansion of the pipe. From our perspective, the key to a proper installation is being able to work in the trench when gluing pipe joints, or compacting the trench bottom and bedding materials. As we discussed last month, the pipe needs to stay in place, maintain the required slope to conduct sewage and be filled only with air between sewage events.
The backfill should be clean, free of rocks, construction debris, organic soil or frozen soil material. This is to minimize the potential to damage the pipe or have the pipe move after backfill.
Steps to follow
Proper bedding and backfill procedures can include the following steps:
- Making sure the bottom of the pipe trench has a good foundation. This can be the original soil material free of rocks and on the proper slope. This is where you want to have the trench wide enough so the bottom or foundation can be properly prepared.
- The bedding material is applied. This provides support for the bottom of the pipe. Typically this material is sand, although some areas allow use of coarser granular materials; so as always check your state and local regulations.
- The sand or bedding material should be compacted using a mechanical compactor. This layer is usually about 3 to 4 inches thick, but it can be as much as 6 inches.
Use the “heel test” to see if the material has been compacted enough. The test is simply to see if the heel of your boot can make an impression in the material. You should not be able to leave this impression. This method is not foolproof but it can be a good indicator of compaction.
Compaction Concerns
Follow the compaction specification guidelines provided by the pipe manufacturer. Additional compaction is required where piping runs under improved asphalt or concrete surfaces. A 90 percent compaction rate is required under improved surfaces, compared to an 85 percent rate for under unimproved surfaces.
The same material can be used for the next layer, called the haunch. This material is applied to the midpoint of the pipe to provide lateral support and keep fines from migrating in from the trench walls. Some jurisdictions require haunching material be gravel not more than 3/4 inch in diameter, so check what is required in your area. The haunch should be tamped under and around the pipe. Then the initial backfill is applied to 6 inches over the top of the pipe before the final backfill of soil material is applied.