Low-pressure drainfields are an excellent treatment option in many onsite applications. A key advantage of low-pressure systems is even distribution of pretreated effluent over the media surface.
Whether a media-filled trench, chamber system, shallow narrow drainfield or other type of soil absorption system, low-pressure application of pretreated septic tank effluent promotes even biomat development and helps ensure good final treatment and dispersal into the natural soil treatment environment.
In addition, the upward spray of effluent through a network of orifices into orifice shields provides “impact flow,” wherein oxygen transfer is promoted, enhancing the aerobic treatment capabilities of the soil. Designers specify the orifice sizing and spacing depending on the application rate established during the site and soils evaluation.
If you provide maintenance for onsite systems, you will surely encounter low-pressure systems. It is essential to understand how to maintain these systems properly.
Knowing the basics
One common question is: Why are these drainfields called low-pressure? The answer is that these systems are pressurized using a pump, and most operate at 1.3- to 3.5-psi water pressure.
In the field, the pressure is typically measured in foot head of distal pressure (each foot head equals .43 psi). The measurement is normally taken at the end of a drainline lateral, either by a static test in clear plastic tubes or as a dynamic test where a column of water is sprayed upward through a 1/8-inch orifice drilled in a drainline lateral end test cap. This test is known as a squirt test.
The application of low-pressure or other pressurized options, such as drip dispersal, is even more important when advanced treatment is employed, as highly treated effluent is very slow in promoting biomat development.
Biomat development is critical to achieving even distribution in the bottoms of the trenches. Advanced treated effluent, when applied to a gravity drainfield, moves quickly downward without the benefit of a biomat and forms a saturated area where, as we have learned, aerobic bacteria cannot survive, thus providing little or no final soil treatment.
System options
There are two commonly specified low-pressure drainfield options: low-pressure pipe (LPP) and shallow narrow drainfields.
Low-pressure pipe systems may have different media options specified. Rock trenches are fairly standard, while sand trench systems are sometimes specified to provide additional in-trench advanced treatment. In either case, orifice shields should be used to protect the orifices from plugging and provide impact flow and oxygen transfer. Many chamber installations employ low-pressure distribution suspended in the chamber housing. (Always refer to design or manufacturer’s recommendations.)
Shallow narrow drainfields are an option in which a larger orifice shield, typically a half-round of 12-inch-diameter PVC, is installed over a shallow, flat-bottom trench with minimal covering soil to promote good oxygen transfer. Actual trench depths, shields and cover soil depths are specified by the system designer.
There are also numerous dosing options for low-pressure distribution systems. The designer may specify locally controlled demand dosing or socially controlled timed dosing. A switching valve may be used to enable rotation of the distributions through multiple laterals or zones, allowing resting between applications or seasons. There are numerous types of switching valves, including manual isolation, manual three-way and automated options such as hydraulic sequencing, electronic servo and electric solenoid.
Doing maintenance
Whatever the option, the maintenance requirements of low-pressure systems are all very similar. While the frequency of maintenance may be determined by local regulations, or may be based on effluent quality, a rule of thumb is once per year.
Before performing any service, it is necessary to walk the drainfield and perimeter area to ensure that there are no existing problems, such as selective fertility, surfacing effluent, saturated areas or erosion. The next step is to measure and record liquid levels in the inspection ports, if present.
These activities are important because the actual servicing will add water to the drainfield area and thus exacerbate pre-existing problems. If you note problems, you will have to postpone service and recommend remediation.
Having documented that there are no problems, the next step is to set up for service. Turn off the pump basin controls and lock and tag the panel breakers. Open up all service points: the discharge pump tank cover, switching valve enclosure, distribution valve access boxes, and lateral end service access boxes.
Inspect and verify the function of the switching valve and service it as necessary according to the manufacturer’s recommendations. Depending on the capacity of the discharge pump tank, you may need to begin adding water at this point. Place squirt caps or clear plastic riser tubes on the lateral end service risers.
With all squirt caps or clear plastic risers in place, and with adequate water in the tank, turn the discharge pump HOA switch to AUTO position. (There is a risk of running the pump in MANUAL position, as pumping too low may draw unwanted solids into the pump intake.)
Measure and record the height of the column of water rising from each lateral end. Next, remove the squirt cap or clear riser tube from all lateral ends. Isolate each lateral by closing down the lateral distribution control valve and noting its position. This will help in rebalancing the system after cleaning.
After noting that there is adequate water in the discharge tank, open one lateral at a time and turn the pump to AUTO, thus flushing water at high velocity through the isolated lateral. Watch the lateral end as accumulated biosolids are evacuated and water begins to run clear. Repeat the procedure for each lateral.
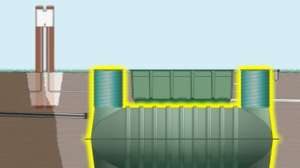
Take care that no effluent is allowed to contaminate the ground surface. Proper configuration of lateral ends is critical here. (See the accompanying drawing.) Neglected systems may require brushing or hydrojetting. If so, additional flushing must be done after this process.
With all laterals flushed and cleaned, reposition the squirt caps or clear riser tubes on the lateral ends and return the distribution valve to the position noted before isolating. Making sure again that there is adequate water in the discharge tank, turn the pump again to AUTO, and make fine adjustments to each lateral distribution valve to achieve even heights, thus even effluent distribution.
You can now stop adding water to the discharge tank. Remove the squirt caps or clear risers, replace the lateral end caps, and secure the access covers on the lateral end, distribution valve and switching valve enclosures. Turn the pump control breakers on and the HOA switch to AUTO, and verify that the liquid level pumps down normally.
Replace and secure the pump tank cover. Walk the drainfield and perimeter area again and verify that there are no problems.
Quick checklist
Here is a quick recap of the critical issues in operation and maintenance of low-pressure distribution systems:
1. Verify that all service points are accessible and intact.
2. Verify that there are no pre-existing problems in or around the drainfield.
3. Turn off the control breakers and switches, and lock and tag the panel.
4. Set up the drainfield for and conduct a presquirt distal head pressure test, and record the results.
5. Isolate the lateral distribution control valves, noting their original position.
6. Flush the laterals one at a time to achieve maximum scouring velocity.
7. Brush or hydroclean the laterals if necessary, and flush again.
8. Rebalance the laterals to ensure even distribution.
9. Secure all lateral ends and enclosures.
10. Return the controls to their normal operating positions and verify normal pump-down.
11. Inspect the drainfield and perimeter area, noting any problems.
To learn more about operation and maintenance for low-pressure drainfields and all system components, check the events calendars at the Web sites of the National Association of Wastewater Trans-porters (www.nawt.org) or the Con-sortium of Institutes for Decentralized Wastewater Treatment (www.onsite consortium.org) for the next Consortium O&M Service Provider training program.
Kit Rosefield is an onsite treatment system service provider serving northern California and based in Mi Wuk Village, CA. He can be reached at kit@septicguy.com.
Continue reading for free