Interested in Systems/ATUs?
Get Systems/ATUs articles, news and videos right in your inbox! Sign up now.
Systems/ATUs + Get AlertsBack in time when we started to work together there was no such thing as a smartphone and, in fact, no such thing as a PowerPoint presentation. Some of you right now are thinking how good that was, not to have to sit through one of those presentations! Well if you attended one of our workshops back then, you would see us bouncing between an overhead projector showing diagrams of onsite system components to a series of slides in a slide projector depicting what was being discussed.
Every trip to the field and every system site evaluation or installation we were involved with resulted in literally hundreds of photographs, of which only a few were of a quality that could be used to depict what we wanted. Regardless, we knew it was important to try and document what went on at the job site through photographs.
Neither of us would try to give instruction on how to take photos or frame shots, as people who viewed our slides would tell you. Rather than wait for a bundle of photos to arrive from the developer, in this day and age of digital cameras and smartphones you can see and evaluate how well you did on a photo and take another one until you get it right. You’re never going to be surprised when your thumb got in the way of the most important shot!
Today’s technology makes it easier than ever to show what happened at your job site and leaves no room for excuses for not having photographic documentation. These photographs are useful if you need to go back and look at what happened at the site if there is a question about proper system location or construction details. So we will share a few ideas about what we think you should be photographing.
Take Notes Too
Photographs should be clearly labeled and filed by site location, as well as time and date of activity. It is not a bad idea to make notes or provide information on the weather conditions at the time. If possible, photos should be taken of the lot features before installation. If you are performing the site evaluation work, all aspects of that work should be photographed with notes made about the location of soil pits, soil borings or percolation test holes. A note here: Photographing soil pits is difficult, but the attempt should be made, especially if there’s a potential for differing interpretation of soil characteristics. A photograph of the staking should be done to identify the drainfield area.
Site preparation work before the installation should also be documented. In the case of above-ground systems like mounds or at-grades, it is particularly important to document surface preparation from the perspective of the overall site and how well the soil surface is scarified.
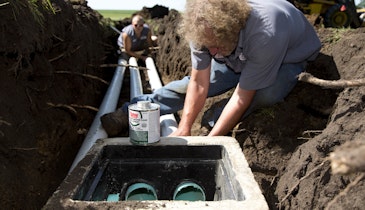
All components of the system should be photographed beginning at the house connection. Installation of the supply piping and any clean-outs as well as the bedding of the supply pipe to the septic tank should be documented. It is important to include the elevations of the outlet from the house and the elevation going into the septic tank.
Tanks and Drainfield
Setting any sewage tanks should be photographed. This includes excavating for the tank, bedding for the tank, backfilling the tank, and with documentation of the elevation at the outlet. All aspects of the pump tank and pump should be part of the record, including the wiring, control panel, pump with notation of the size and capacity, all floats and their settings, and then how the whole pump tree setup is located in the tank.
Similarly, supply piping from the septic tank to drop boxes or distribution boxes should be photographed along with the boxes set in place. Trench excavations should be recorded and then the placement of the rock, chambers or other drainfield media. When photographing rock, have a close-up with a scale to verify the correct size and photos showing that it is clean rock.
For above-ground systems, sand and rock placement should be documented along with photos showing the proper elevation of both. If chambers or other non-rock products are used, take photos showing how they were installed and properly blinded to keep them in place.
Placement of the drainfield piping or placement of holes and the gluing process in a pressure distribution system should be documented. If the pressure distribution system is tested before completion, images of the test should be included. In some areas this is a required activity, however it should also be done in areas where it is not required.
One system we worked on had an improper glue job, so when the system was pressurized, water squirted out of the joints and — needless to say — distribution was anything but equal! If the test had not been conducted, the installer would have been back there in a few weeks excavating to repair the distribution system.
Follow-Up Photos
When the system is backfilled and the site is finished, more photos should be taken. This includes the type of equipment used and how the site was finished. If the area was mulched and seeded, take photos of this as well.
Finally, we always recommend visiting the site about a month or six weeks into operation to check on things. Photos should be taken at this time to show what the site looks like and notes should be taken to document any special areas of concern. This should provide a comprehensive record you can refer to in the future if there are questions on the part of the homeowner, the regulatory authority or anyone else about how things were done during the installation.