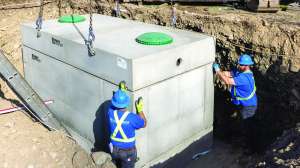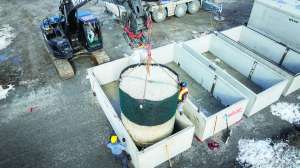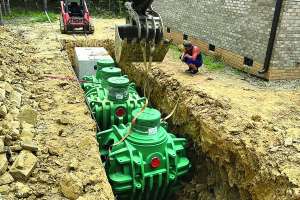

A complete pumping system includes a pump tank, pump and controls. The first issue is that the tank must be watertight and constructed of materials that will not corrode or decay. The access for the pump and other components should come to the finished grade. In addition, the access should be far enough above the finished grade to prevent water intrusion from rain events.
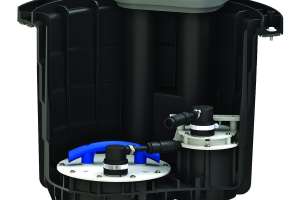
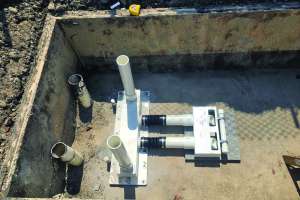
The pump, piping and floats should be located directly under the lid, as easy access to these components for management is necessary. The cover of the pumping tank, the septic tank, and all cleaning access extensions must be watertight to prevent groundwater from infiltrating the system. Pipe connections to the tanks also must be sealed to be watertight. The cleaning access must be securely fastened or locked so unauthorized persons cannot enter the tank.
Be extremely careful to ensure the pump tank supply line does not settle. Additional support may be necessary to ensure the system will operate without sagging, which can lead to clogs or freezing in cold climates. Placing the supply line in conduit or a stronger pipe throughout the excavation area is a recommended practice along with proper pipe bedding.
As discussed in previous articles, pumps are sized according to the specifications of each system, and a specific model should be indicated in the design. A “similar” pump should not be used unless confirmed in writing by the designer.
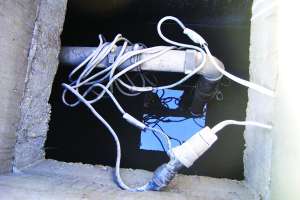
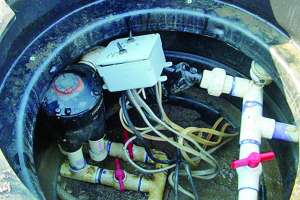
Proper pump installation is critical to ensure the pump will perform as designed. No electromechanical devices or connections should be in the pump tank or cleaning access/riser. The electrical plug-ins should be in a weatherproof enclosure near the pumping tank or building. It is a great idea and sometimes required to attach the control wires to a separate pipe (float tree) and the pump to a plastic rope or chain with an anchor to remove the control wires without removing the pump. Also, if the pump has malfunctioned, it can be removed without disturbing the control wires.
The other issue this helps with is when floats are the problem, they can be removed and adjusted for replacement without removing the pump. Although ropes are commonly attached to the pump, these can be problematic if they become detached at the riser as they fall into the tank and get sucked into the impeller of the pump and cause pump failure. Chains are an alternative but expensive. Tom Fritts, of Residential Sewage Treatment based near Kansas City, Missouri, uses a piece of 12/2 UF wire often needed for electrical repairs. If the wire detaches at the riser, it is rigid enough to stand up in the riser.
Pump systems should include a control panel. The control panel can be simple or more complex based on the functions it must perform. Electrical components in the panel respond to water level sensors or floats in the tank. The components then perform a variety of essential functions:
Several types of devices may achieve these functions. In all cases, electrical components and connections must be adequately protected from the elements and the corrosive environment of the pump tank. Ideally, this is achieved through use of a National Electrical Manufacturers Association 4X enclosure (4X refers to watertight and corrosion protection enclosure) with properly sealed connections.
Two methods, or a combination of the two, are common in outdoor wiring. One method is to place electrical wires inside a conduit. The other is to use cable. In either case, protection from physical damage, water, and corrosion must be provided. Running wires through sealed conduit provides physical, water and corrosion protection.
Several kinds of conduit are acceptable for outdoor use. Rigid metal conduit made from aluminum or steel provides equivalent wire protection. However, aluminum conduit is not recommended for installation where it is directly in contact with soil. Rigid PVC conduit can be used above ground. High-density polyethylene conduit is suitable for underground installation.
Do not use thin wall conduit for underground or outdoor installations. An underground feeder cable can be buried without conduit protection. Still, physical protection for underground cables is highly recommended to reduce the risk of spading through the cable later. This is particularly true around the septic tank.
Another advantage of running the wire in conduit is wire replacement in the future. If the wire is directly buried, you must excavate and/or bury new wire. If in conduit, you pull the wire from one end and feed the replacement wire in the existing conduit.
Combining the conduit and cable wiring methods is also an option. Conduit can be used around cable for physical protection. Conduit is particularly useful to protect cables entering and exiting the soil. If conduit and cable are combined, appropriate connectors and bushings are needed to transition from one system to another. Minimum burial requirements apply to wire in conduit and cables.
The area around the conduit entering the tank should be sealed to prevent surface water from entering the tank through the conduit. If the conduit provides a continuous connection between the control center box and the tank, the conduit entrance to the box should be plugged with electrical putty to prevent the movement of moisture and corrosive gases into the control box. Provide an outlet for the wires through the side of the cleaning access.
Do not use nonmetallic cables for underground installations. While it is an excellent material for interior wiring, it will not withstand moisture conditions in the soil. Consult with an electrician. Ensure the wire has the proper capacity for the electrical demands of the pump. This is done by comparing the length of wire necessary from the pump to the power box and the horsepower required for the pump. Having these two values allows for the proper selection of the wire sizes (see table).
The table shows wire specifications for various lengths and motor ratings. Most charts use amp draw instead of horsepower. Pump motors will have the amp draw stamped on the nameplate, and you can use that for wire sizing. These wire sizing charts are available online, making this an easy process. A second wire should be run for the alarm and on a second circuit.
Continue reading for free