Job staging is executed on the start of the construction day and includes the delegation of responsibilities to the crew and ends with a final inspection by the permitting authority and/or a walk through with the property owner.
Construction notification to local authority - Some jurisdictions require a start of construction notification. If several inspections are required from the approving agency, scheduling those is important to avoid delays in the construction.
Do you have everything you need on site?
1. Equipment - Rental or loaned equipment that is needed at the site and is not part of the regular fleet should be secured for delivery or pickup at this time. Also, all other equipment that is not part of the installer's regular toolbox needs to be available. This careful scheduling is necessary in competitive markets where tight schedules can provide the advantage for an installer for profit taking. Equipment that could be at other sites should be made available. Additionally, any special equipment needs to be scheduled for delivery at the site for start of construction.
2. Materials - Construction materials need to be available for pickup on the day needed. Coordination is typically necessary when procuring materials from a new supplier that is not familiar with the business practices of the installer. Rapport with suppliers and contractors can ease minor scheduling problems.
3. Personnel - Personnel are one of the most important factors in the installation. Planning the job requires that the installer determine how many people are required to finish the job in a timely and efficient manner. With too few personnel, the job can take longer than necessary. Use of too many people, however, can lower the profits for that job. Making sure that the personnel are present for the start of construction depends generally on the ability of the installer to retain good personnel with low turnover.
Starting the installation
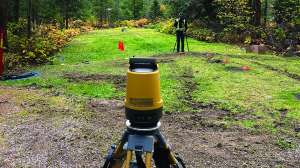
Benchmark - Upon arrival at the site, the benchmark is either setup if not included in the design or identified and its elevation noted for field calculations. The benchmark may be checked by comparing the benchmark to actual shots on the edge of pavement or other features with a labeled elevation on the design plan.
Property lines - The property lines, wells, proposed wells, and other features requiring setbacks from the onsite system need to be verified, especially if any component is at or close to a setback requirement. The property lines are the purview of a professional land surveyor and should not be estimated from any plan. Permanent markers set by a professional land surveyor and referenced on a design plan or survey plan provide the least liability to the installer in case of a property line or setback dispute.
Utility location - After identifying the property lines, the utility location markers should be verified and compared to the proposed onsite system location. Some jurisdictions allow for tolerance when installing components or soil treatment areas. These tolerances may be both horizontal and vertical so that if, for example, small movement of a tank clears a setback requirement on the site, the plan may not need to be resubmitted or as-builts drawn.
Verification of topography/drainage - The design plan and the existing contours need to be reviewed to verify that the plan and site match. During this verification, drainage patterns also need to be verified to ensure that the construction and reshaping of the ground surface can happen according to plan. Current construction on the site can alter the surface of the land and alter drainage patterns. Verify topography and that soil movement about the soil treatment area has not occurred by others involved in the project.
Plumbing stub-out - Another verification needed is the stub-out elevation and location. Some general contractors may not be knowledgeable about onsite wastewater treatment systems and about the requirements for separation distance from the soil treatment area, seasonal high ground water table, impervious soil, or ledge. The typical mistake is to lower the top of the foundation and/or lower the stub-out elevation to accommodate the fill around the foundation or to cut costs of construction. Once the stub-out elevation is less than per the design, it is very difficult to reset it at a higher elevation. If the installer goes ahead with an installation at a lower elevation, the system might not perform as intended and early malfunction might occur. The installer may be held liable after an investigation of a hard malfunction.
The location of the stub-out is also very important. If it is not located as per the design, the installer needs to route the effluent to the location where the first component of the system is relative to the design. In gravity applications there is a drop in elevation in the building sewer piping that may not match the design.
System components stake-out - The system components should be staked out. A design plan may call for permanent markers close to the onsite treatment system, an existing foundation, or other physical feature that is permanent or semipermanent.
Horizontal setbacks - All horizontal setbacks need to be verified once the components are staked out. Critical distances to wells, wetlands, property lines and other strict jurisdictional setbacks need to be verified before installation can occur. If the components or the soil treatment area are near the setback, a professional land surveyor or engineer can be hired to set the location of the system. Verification of the location needs to take place as well as the verification of all setback requirements. The setback verification includes all those setbacks specified on the design plan as well as those setbacks to wells or other features that were mistakenly left out of the plan.
Finishing up
Final inspection - The planning process typically concludes with a final inspection with the permitting authority. The final inspection should also include a walk-through with the owner once the system is finalized and all contractual agreements have been fulfilled. All components and improvements can be checked off a list with the owner and at the end can be used as a final acceptance by the owner so the final payment can be released.
About the author
Sara Heger, Ph.D., is a researcher and educator in the Onsite Sewage Treatment Program in the Water Resources Center at the University of Minnesota, where she also earned her degrees in agricultural and biosystems engineering and water resource science. She presents at many local and national training events regarding the design, installation and management of septic systems and related research. Heger is the President of the National Onsite Wastewater Recycling Association and she serves on the NSF International Committee on Wastewater Treatment Systems. Ask Heger questions about septic system design, installation, maintenance and operation by sending an email to kim.peterson@colepublishing.com.
Continue reading for free