Interested in Excavating?
Get Excavating articles, news and videos right in your inbox! Sign up now.
Excavating + Get AlertsThis is the last in a series of four columns on site evaluation based on our presentations at the last Pumper & Cleaner Environmental Expo in February.
One of the tools used for site evaluations in the past is the percolation test. This test has fallen into disfavor to determine soil hydraulic loading rates primarily. In fact, some states now do not allow the test to be used. We feel the test is still a useful tool to evaluate soil and can help resolve some problem situations. For instance, the percolation test is useful to evaluate the soil permeability relationship when the soil has been disturbed. Disturbed includes situations where the system is going to be installed in fill soil, and where there has been smearing and compaction due to construction activities.
STUDY THE SITE
In the case of fill, any soil with a texture finer than loamy sand will exhibit dramatic reductions in the ability to accept septic tank effluent when it has been moved from one site and deposited in another. The lack of distinct soil horizons, changes in vegetation type and soil colors that are different than natural profile colors are ways to identify a fill site. Soil texture and structure are not reliable indicators of the ability of these soils to accept effluent.
Relationships between a percolation test and soil texture have been established, and up until recently were used to determine soil hydraulic loading rates. In the process of placing soil on the site, the material may have been subject to compaction, which would result in lower percolation rates and lower soil hydraulic loading rates.
When the soil has been too wet to work, the backhoe bucket often smears the sidewall. Smearing sidewalls can also take place when the moisture content of the soil is considered OK. Smearing generally is relatively thin, approximately 1/8 inch thick. This has the opportunity, with careful excavation, to be removed. Compaction on the other hand can affect the soil over much wider areas and to a deeper depth. It is often associated with working in wet soils. It is usually caused by either heavy equipment traffic or in areas where materials have been stockpiled.
If the fill or compacted soil has been in place for a while, it can be difficult to identify. But a lack of structure and different soil materials found nearby are reasons to be cautious about using only a soil evaluation to establish the loading rate. If there are not clear horizons, there is unclear or a lack of soil structure characteristics and the soil seems harder to dig, a percolation test will confirm or give another estimate of the soil hydraulic loading rate.
LOOK AT ALL SOIL FACTORS
There are several reasons the percolation test has fallen into disfavor. One is the variability of the results obtained, even from one hole on a site to another. Also, the test in some places was used as the sole deciding factor about whether a system should be installed. This approach ignored all the other important factors of soils including periodic saturation, dense layers and landscape position. Using percolation-only criteria set up a large number of systems for failure. Of course, this may be due, in part, to the attitude held for a long time that onsite systems were nothing but temporary solutions until the big pipe arrived.
To make the percolation test a useful tool for tough situations, it is important to recognize the test must be conducted consistently and with no shortcuts. If this is done over a period of time and a number of sites, the site evaluator and local government inspectors will develop a body of knowledge about the soils and conditions in their area. This is invaluable to the design and installation process.
One thing we find interesting in our travels is the wide variation of the percolation tests we see. The test itself was established in the 1920s and then captured in early health codes. However, using two of the states we work in as examples shows how different this test can be depending on location.
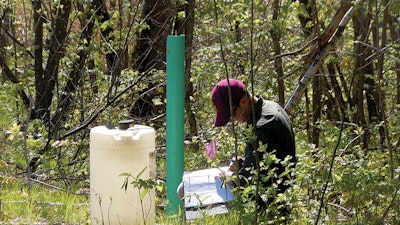
In Minnesota, an 8-inch-diameter hole is required to the depth of the infiltrative surface of the system. The hole will be formed using a fence post auger, a common tool that provides a consistent hole. In Arizona, the evaluator is required to construct – without disturbing the soil structure – a 12-inch square hole or a 15-inch-diameter round hole. The most common approach is to use a 5-gallon bucket with holes in it to line the 15-inch-diameter hole. This means results from Minnesota tests cannot be compared to Arizona results because the hole size is different. The point to be made is: Know your state rules and follow them consistently, recognizing you cannot simply compare numbers between areas where the test is conducted differently.
A USEFUL TOOL
A key area of the test is the requirement that if the soils are any texture other than sandy, the holes need to be presoaked. The rationale for this is that if the evaluator starts with a “dry” soil and the soil has a percentage of clay particles, it takes time for those particles to swell, reducing the percolation rate and more closely mimicking what happens in the soil when effluent is applied on a consistent basis. We see people always trying to shortcut this activity, which causes test results with faster rates.
If the evaluator is using this test to confirm or adjust loading rates due to the factors discussed above, this can lead to large over-estimates of the ability of the soils to accept effluent, resulting in systems that are much smaller in size than they should be. Regarding the pre-soaking, both states require maintaining a depth of water 12 inches above the bottom of the hole for a minimum of four hours and then coming back 16 to 30 hours later after the soil has had a chance to swell, to run the test. This obviously adds a lot of time to the process, which is why many take shortcuts.
The bottom line: We see this test as a useful tool if it is used and performed properly and consistently.
