Recently we read an article about an onsite company that provided site evaluations, maintenance and service in addition to installation. One issue they wrestled with was how and where to place soil evaluation pits. While attending workshops in the Southwest, we’ve encountered similar questions about soil evaluation. The challenge in that region is dealing with a lot of rocks, ruling out effective use of soil probes.
Another development that has led to wider use of soil pits versus borings or probes is the need to evaluate soil structure as a part of the soil evaluation to determine the proper soil sizing factor.
In the early years of the University of Minnesota education program, our recommendation for soil evaluation was to determine the approximate location of the soil treatment unit based on where the septic tank would be placed and then look at the surface features of the site, including land slope, direction of the slope, vegetation types, run-on potential and other significant landscape features.
Using a soil probe we would then make a quick survey of soil texture and color within the area to identify unusual conditions. That would be followed by a hand boring using a 3-inch bucket auger in the center of the proposed location to evaluate texture and structure to a 5-6 foot depth. Based on these results and how the treatment area would lay on the contour, additional borings would be conducted at the corners of the rectangle defining the area for the treatment unit.
If soil evaluation is used to establish soil sizing criteria, most states require structure be evaluated. So 3-inch bucket augers have largely been replaced by soil evaluation pits. Using the same approach outlined above, there would be a total of five soil pits for the evaluation. Not only is this a lot of digging, but people have pointed out that the testing alone would disturb or dig up a good portion of the area for the system. This calls for a little guidance about where to locate the pits and, of course, how many pits to dig.
A word of caution: Anytime you excavate or dig, remember to utilize your state’s hotline to locate underground utilities!
Our recommendation – consistent with Minnesota rules regulating site evaluations – is to have three soil pits. These should be located within or preferably on the borders of the proposed area. At least one of the pits should be located where reconnaissance probing indicates the most limiting condition of the site. Limiting conditions could be evidence of seasonal saturation, bedrock or dense soil material.
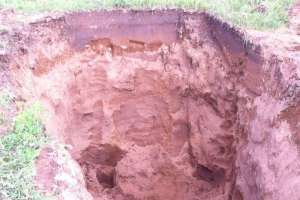
Evaluation pits should be excavated 3-5 feet wide, approximately 4.5 feet deep and 6-10 feet long. Most soil structure occurs within a 5 foot depth of the surface which is the reason for the 4.5 foot depth. This is deep enough to allow evaluation of structure and keeps the pit shallow enough to be safe for the site evaluator.
If texture and color need to be evaluated deeper to make sure that there is not a limiting condition, hand boring or additional excavation can be done, with the observations made at the ground surface in the spoil pile without entering the pit.
The pit should be oriented so one of the pit faces captures sunlight for illumination. One important aspect of determining soil color is to have adequate natural light. Ideally the excavation is T-shaped with a ramp being the leg of the T. This provides easy access to the face where the soil will be described and allows the sun to shine along the entire face.
Another frequent question we receive: Where do I locate the soil evaluation pit if I am troubleshooting a failing system? Here the area of the soil treatment unit is defined and it should be obvious that digging within the system itself would not be a good idea. The method to locate the pit is similar to a site evaluation on an undeveloped lot. Visually survey the site and surroundings to identify evidence of disturbance, the land slope characteristics and if the soil treatment area is subject to surface water run-on.
Then use a hand soil probe, if possible, to make a short survey around the perimeter of the system and, if possible, at points between the trenches in the soil treatment unit. Based on the results of these probes, locate the pit at the perimeter of the treatment unit on the contour that would represent the most limiting soil condition.
You may not be able to select the orientation, but do as described above if you can. To begin, excavate only to the elevation where the bottom of the treatment trenches are installed. Use a bucket auger or soil probe to evaluate deeper, looking for limiting conditions within the specified separation distance.
Hopefully these tips help when you are scratching your head over where to locate your next excavation pit.
Continue reading for free