When I started installing septic systems five years ago, I took all the required courses, I read all the trade magazines I could get my hands on and I asked my installer and planner mentors every question I could think of. But I still found myself wishing there was a comprehensive list somewhere of installer tips and tricks.
So to help others in the same boat, here are some of my favorite tips — many of which I learned on my own, though some of them came from a few of the great mentors I’ve had over the years.
There are two sides to a 4-inch PVC coupling
Seasoned installers will know this, but rookies probably won’t. The outside of one of the two sides of all 4-inch PVC sewer couplings sold up here in British Columbia (Canplas brand and others) has a slight taper. I imagine this is the same with couplings sold in the U.S. You must use the side without the taper when gluing into a Polylok PL-122 effluent filter or in any application that utilizes the outside of the coupler as a gluing surface or else the joint will be too loose. A quick dry-fit first will confirm which side you need to use.
Glue pretank sewer pipe with the bell facing uphill
While I haven’t seen any scientific evidence online or know of any industry rules here in British Columbia or beyond to support this thinking, it is logical to me. When gluing sewer pipe together, especially before the septic tank where there are solids flowing down the pipe, wherever possible glue the bell end of the pipe facing upstream (the male end facing downstream.) This results in slightly less of a lip being encountered by downhill waste flow and less chance of buildup occurring and leading to eventual clogs.
Adjustable drain holes in pump chamber plumbing
Those of us in the north must always be thinking about freezing when installing. The plumbing loop at the top of the pump chamber is particularly vulnerable. Instead of the standard two or three drain holes that are just drilled into the pipe and that spray uncontrolled into the pump chamber, consider using a T-fitting, then a reducer to 1/2 inch, then a 1/2-inch ball valve, then a cap with a hole size of your choice drilled in the cap bottom. This allows you to direct the flow exactly where you want it to go (for example, away from sensitive sensors), throttle the flow up or down, or completely shut it off if you need to for testing. I’ve also used this technique in pumped-to-D-box systems for throttling back the amount of effluent going into the D-box. Note: Be sure to add the friction loss for these T-fittings into your pump sizing calculations. (Thanks to longtime installer Barry for these last two great tips.)

A better way to do valve boxes
Despite our best finishing efforts, I was never happy with the way traditional plastic irrigation boxes both looked on the surface and how they functioned underground. Often the boxes we used were either not quite long enough so dirt easily accumulated around the valves at the bottom or they were too long so they didn’t work with the final grade we wanted on the project. After about three installations using the traditional boxes, I thought of using 6-inch white PVC pipe cut to the required length and then putting a simple round 12-inch concrete paver on top. We’ve been doing it that way ever since. I think the result is a much cleaner look on the surface, and it is more functional below the surface. Getting the perfect final grade is always easy. Often, we’ll drill a hole at the bottom for the lateral and sweep to be inserted, then glued for an even cleaner job. This method is also cheaper than valve boxes. Note: As with most ways to do valve boxes, this way must be protected from traffic — heavy down pressure on the 6-inch pipe could cause the lateral below to crack or be sheared off.
Using a blade float and bucket for cleanup
Any operator with some experience on an excavator that has a front blade has tried scooping against it with their finishing bucket as a way to pick up that elusive last half a bucket or so of material. Of course, that inevitable collision between bucket and blade (however light) is enough to make the operator cringe or at the very least be forced to move very slowly. But try it with the blade in float position if your machine has float. It works like a charm. This trick is even more helpful if you have an angle blade so you can get blade and bucket exactly parallel to each other easier. I was pretty excited when I figured this one out.
Move material fast with the excavator stick
Experienced operators will know this, but this is a critical tip for those just learning to use an excavator so it's worth being included here. The stick moves way faster than the boom. When moving anything light or piles, maximize use of the stick and minimize use of the boom. You will be a much faster operator practicing this. Conversely, it is your boom that gives you the power when the digging gets hard. Thanks to Ben, one of my excavation mentors, for giving me this tip early on so that the theory of this is deeply ingrained in me and I practice it without thought.
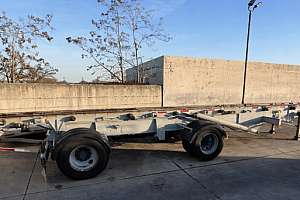
Count for safety and to avoid repair bills
Towing heavy equipment is risky business. A small mistake can be very expensive, or worse, injure or kill. When attaching or taking off each of my trailers, I have a magic number I count up to that's specific for each trailer. For example, on my gooseneck trailer the number is seven: landing gear left, landing gear right, gooseneck pin, safety chain right, safety chain left, emergency brake module, seven-pin harness. Don’t let yourself get distracted for any reason until you’ve reached that magic number in your head. Keep the tailgate out of the count or you could find it closed when it needs to be open.
Get dust out the easy way
Summer in the Kootenay Mountains where I live means the inside of an enclosed excavator or skid-steer collects an abundance of very fine dust. This is the kind of dust that seems to get past the cabin air filters and accumulates on every surface. When vacuuming between jobs is not an option, a quick solution is to carefully remove anything possible inside the machine that could fly away, then leaving the door and all possible windows open when towing. In minutes at highway speed, all dust will be gone. I’m not advocating getting rid of anything but fine dust this way or doing anything that a motorist behind you would be concerned by. Remove the floor mats first if they have any gravel or clumps of dirt on them. A clean cab equals a happy and relaxed operator.
Share your knowledge
With about 100 installations under my belt now, I’ve learned a thing or two. But I know there is so much more out there I don’t know about yet. Some of you probably have thousands of installs under your belts. I am as eager as I was five years ago to keep learning new and better ways of work. Installers are a competitive bunch so some might hesitate to give up a timesaving technique or a better way of doing something. But if you’re good, you’re good — you shouldn’t need to worry about your competitors.
Let’s keep the conversation going. We want to keep sharing advice from other installers. To be featured in a future article, email your best tips to kim.peterson@colepublishing.com.
About the author
Joe Karthein is based in the rural area surrounding the mountain town of Nelson, British Columbia, where he operates his small business, Sentinel Excavating. Karthein has worked in the onsite industry for five years and to date has completed about 100 septic system installations.
Continue reading for free