In Minnesota, we have used mound soil treatment systems for 40 years. Once our installers got over the fact that there were some specific requirements for constructing mounds, and once they saw that mounds required a pump and pressure distribution, we had great success.
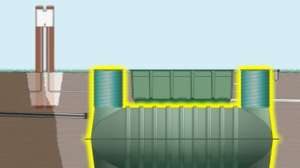
Mound systems were developed to address several highly specific soil problems while maintaining the desired balance between making the surface water go away and treating the septic tank effluent. The issues addressed by mounds and other aboveground systems such as at-grades are shallow soils over bedrock, slowly permeable clay soils, and high water tables or seasonally saturated soil conditions.
Since these systems are used to solve soil problems, it should be obvious that the first priority is to protect whatever good soil there is on the site. There needs to be at least one foot of suitable soil to construct a mound. Suitable soil means a soil that accepts water and has an adequate depth to bedrock, saturated soil or another slowly permeable layer.
In all cases, the soil should be kept in a natural condition and not moved around or damaged. The topsoil — or A horizon — of the soil profile should be kept in place and not removed for future use. This part of the soil is generally the most permeable to water and air and the most biologically active.
Since we are solving problems due to shallow soils, or suitable soils of limited depth, it becomes all the more important to protect the soil before, during and after system installation. Therefore, any traffic that might cause smearing, compaction or damage to the soil surface should be prevented.
Save the stumps
The first consideration is slope. If the site is sloping, the system needs to be laid out on the contour, just like any other soil treatment unit. Establish the original grade elevation at the upslope edge of the absorption bed, and use that elevation as a reference throughout the installation process.
In wooded areas, trees should be cut off at the soil surface and the stumps left intact. Remember: The mission here is to protect the soil from damage because we have a limited amount of it. Removing stumps will likely remove some of the soil. And in the case of loamy or clayey soils, the act of stump removal will result in smearing and compaction, reducing the soils’ capacity to accept and treat effluent.
We have recently seen educational materials suggesting that stumps can and should be removed. From our considerable experience in wooded landscapes, this is exactly the wrong approach. The surface area taken up by stumps is relatively small compared to the entire infiltrative surface under the mound, and future subsidence under mound operating conditions is minimal. The risk of soil damage is too great to use any practice that will disturb large areas of soil that will be under the system.
If there is long grass on the site, it should be cut off to a height of no more than 2 inches — and shorter is preferable. The clippings or cuttings should be raked or otherwise removed from the site.
The supply line from the pump tank to the mound should be installed before surface preparation. This way, the trench can be properly backfilled and compacted to prevent formation of a pathway for effluent to seep out the toe of the mound along the piping trench.
Roughing it
The total area under an aboveground system, including the area under the berms, should be roughened to break up any sod layers and to provide a suitable transition zone between the original soil and the clean sand fill that will be placed for mounds, or the rock media to be used for at-grade systems.
Prepare the site by breaking up the sod to a depth of 6 to 8 inches. Do this working perpendicular to the slope, and in the process eliminate any surface mat of vegetation that can “slime off” and prevent infiltration of the effluent into the soil.
The best way to prepare the surface is to use your backhoe bucket teeth to leave the surface rough. Where possible, move your machine around the perimeter of the site, reaching out with the backhoe bucket.
You can also prepare the surface by using a moldboard, chisel plow, or disc, if you have access to that equipment. Moldboard plow furrows should be at least 8 inches deep and should be thrown upslope. There should be no dead furrow under the system.
Do not use a dozer or front-end loader to prepare the surface, as these machines will smear and compact the soil. Never use a walk-behind or tractor-mounted rototiller for surface preparation. Rototilling destroys the natural soil structure at the surface and will lead to compaction that reduces soil infiltration rates.
Covering up
Once the surface has been properly prepared, installation should proceed immediately. Keep the surface free from all traffic and cover the soil to prevent rain from falling on the surface. Maintaining the soil’s ability to accept effluent is critical to a successful mound or at-grade system. When the sand is placed, maintain at least 6 inches of sand under the tracks of the equipment to prevent soil compaction.
Remember that the priority is to maintain the limited soils found on the site and to protect their ability to accept and treat effluent. Using the wrong practice for surface preparation can turn what was a tough site into an impossible situation. So treat that soil very carefully.
Continue reading for free